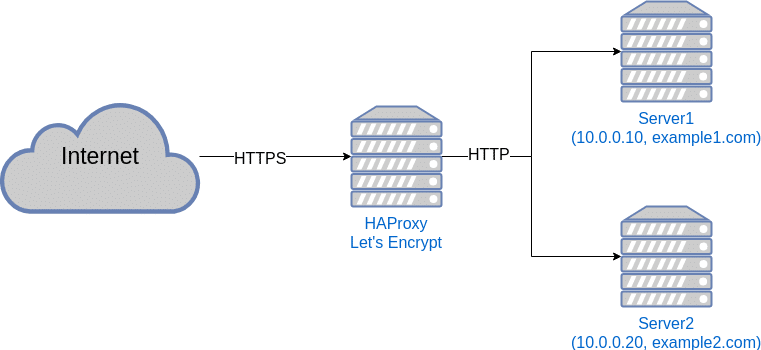
With only one public IP-address you’ll have to use different ports if you want to use multiple webservers. But that’s kind of useless as you can’t ask users to type example.com:81 in the browser instead of just example.com. So how do we solve this problem?
Use a reverse proxy
By directing all traffic on port 81(HTTP) and 443(HTTPS) to a server running a reverse-proxy you’ll be able to choose what server the traffic should be forwarded to based on the host header that the browser sends with the request.

There is two popular proxy options: HAProxy and NGINX. In this guide we’ll be using HAProxy on Ubuntu 18.04. We will also set up Lets Encrypt to handle TLS-certificates.
Install HAProxy
HAProxy is easy to install, so let’s get to it.
root@tops-lamprey:~# sudo apt update
root@tops-lamprey:~# sudo apt dist-upgrade
root@tops-lamprey:~# sudo apt install haproxy
So now we have haproxy installed and it’s time to configure it.
Configuring HAProxy
In this setup we have two webservers each hosting a seperate website. Server 1 with the IP-address 10.0.0.10 and Server 2 with the IP-address 10.0.0.20. Server 1 hosts example1.com, while Server 2 hosts example2.com. Now it’s time to configure it.
Open the /etc/haproxy/haproxy.cfg file and add a frontend and three backends to the bottom of the file like this:
frontend http_front
        bind :443 ssl crt /etc/haproxy/certs/ alpn h2,http/1.1
        bind :80
        default_backend web_1

        redirect scheme https code 301 if !{ ssl_fc }

        # Use the web_encrypt backend if this is a request for domain verification.
        acl is_letsencrypt path_beg -i /.well-known/acme-challenge/
        use_backend web_encrypt if is_letsencrypt

        # Decide on what host to use
        acl is_example1 hdr_end(host) -i example1.com
        acl is_example2 hdr_end(host) -i example2.com

        use_backend web_1 if is_example1
        use_backend web_2 if is_example2

backend web_1
        option forwardfor
        server server1 10.0.0.10:80

backend web_2
        option forwardfor
        server server2 10.0.0.20:80

backend web_encrypt
        server letsencrypt 127.0.0.1:8888
Currently we have set the web_1 backend as the default, but you can set it to whatever fits you.
Get ready for certificates and add a default one
You’ll need a certificate folder that HAProxy can check for certificates, so let’s create one:
root@tops-lamprey:~# sudo mkdir /etc/haproxy/certsHAProxy needs a certificate in that folder to start and we don’t have any yet. Therefore we just create a self-signed one. You can just press enter on all fields:
root@tops-lamprey:~# sudo openssl genrsa -out domain.key 2048 &&
sudo openssl req -new -key domain.key -out domain.csr &&
openssl x509 -req -days 3650 -in domain.csr -signkey domain.key -out domain.crt &&
sudo cat domain.key domain.crt >> /etc/haproxy/certs/aaaaa.default.pem &&
rm domain.crt domain.csr domain.key
Now you can restart HAProxy like this:
root@tops-lamprey:~# sudo systemctl restart haproxyAnd then access the IP of the server running HAProxy in the browser to check that you get a certificate warning.

Create valid certificates
The proxy host will also run Let’s Encrypt certbot to create and renew certificates. Since the proxy will handle all TLS/HTTPS traffic for you, you’ll have to make sure the backends are using HTTP.
First off, let’s install Let’s Encrypt:
root@tops-lamprey:~# sudo apt-get install software-properties-common && sudo add-apt-repository universe && sudo add-apt-repository ppa:certbot/certbot && sudo apt-get update && sudo apt-get install certbotThen create a script that will be used to move new and renewed certificates into the /etc/haproxy/certs/ folder. The script also needs to reload HAProxy to make use of the new certificates when they change.
Create /root/renew.sh with the following content:
#!/bin/sh

set -e

for domain in $RENEWED_DOMAINS; do
        TARGET_FILE="/etc/haproxy/certs/${domain}.pem"
        cat "/etc/letsencrypt/live/$domain/fullchain.pem" \
        "/etc/letsencrypt/live/$domain/privkey.pem" > $TARGET_FILE
        chmod 400 $TARGET_FILE
done

systemctl reload haproxy.service
Then make it executable:
root@tops-lamprey:~# sudo chmod +x /root/renew.shMake sure this script is used when ceritificates are renewed by editing /lib/systemd/system/certbot.service like this:
[Unit]
Description=Certbot
Documentation=file:///usr/share/doc/python-certbot-doc/html/index.html
Documentation=https://letsencrypt.readthedocs.io/en/latest/
[Service]
Type=oneshot
ExecStart=/usr/bin/certbot -q renew --deploy-hook /root/renew.sh
PrivateTmp=true
Set up DNS
Make sure that both example1.com and example2.com points to the IP-address of HAProxy. It can take some time for the changes to come into effect, so give it some time to update.
Get valid certificates
Now you just have to get the certificates. Remember to replace <your email> with your own email:
root@tops-lamprey:~# sudo certbot certonly --standalone --http-01-port 8888 --preferred-challenges "http-01" --agree-tos -m <your email> -d example1.com --deploy-hook /root/renew.shroot@tops-lamprey:~# certbot certonly --standalone --http-01-port 8888 --preferred-challenges "http-01" --agree-tos -m <your email> -d example2.com --deploy-hook /root/renew.shCongratulations, you now have two webservers behind the same IP-address.

2 replies on “How to run multiple webservers with one IP-address”
Thanks for your great article. Could you clarify where haproxy should be installed? In server 1, server 2 or in another separated server ?
Vinn
Either of those options will work if the goal is simply to use HAProxy as the entry point and then direct traffic to the current server(s).